> ## Documentation Index
> Fetch the complete documentation index at: https://docs.spurtest.com/llms.txt
> Use this file to discover all available pages before exploring further.
# Login States
> Manage authentication across your tests efficiently by reusing login sessions and avoiding redundant authentication steps.
## What are Login States?
Login states in Spur allow you to manage authentication across your tests efficiently. Authentication is a crucial part of many test scenarios.
Spur provides flexible options to handle authentication states across your tests, enabling you to start tests from authenticated states or save login states for reuse. Configure these settings in Test Editing Side Peek.
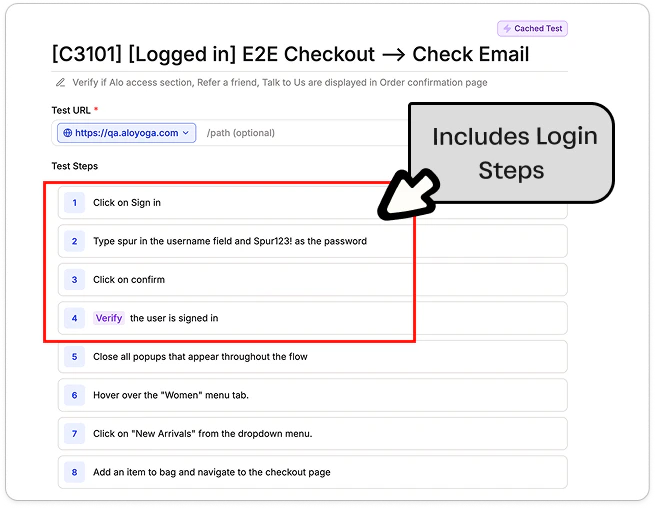
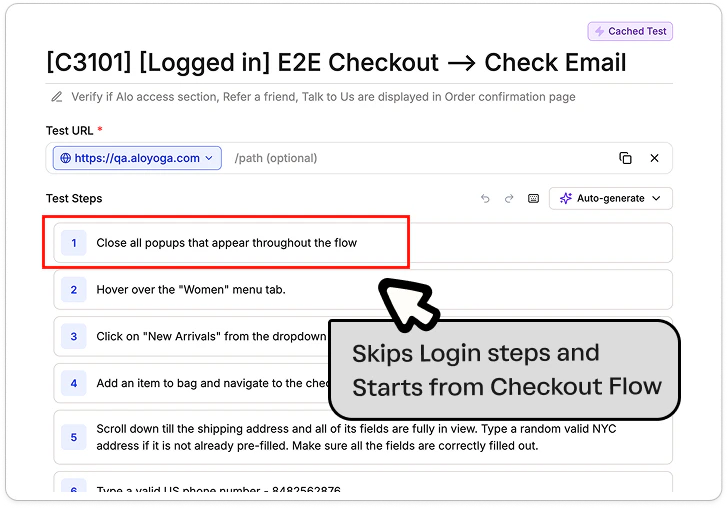
 ## Before and After Login States
Without login states, every test that requires authentication must include its own login steps, adding redundancy and slowing down execution. With login states, you save a login session once and reuse it across tests, so they skip straight to the actual workflow.
## Before and After Login States
Without login states, every test that requires authentication must include its own login steps, adding redundancy and slowing down execution. With login states, you save a login session once and reuse it across tests, so they skip straight to the actual workflow.
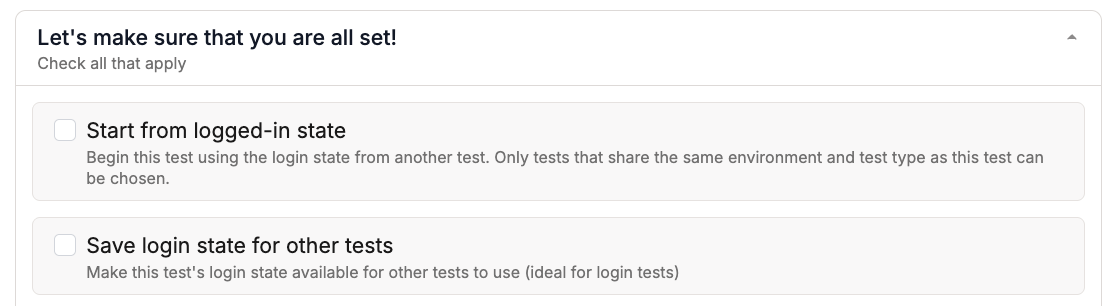
 ## How to Configure Login States
During test creation in Test Side Peek, check below for more information about Login States options.
## How to Configure Login States
During test creation in Test Side Peek, check below for more information about Login States options.
 Select the appropriate login state option based on your testing needs.
Begin this test using the login state from another test. This allows tests to skip login steps and start directly from an authenticated state, reducing execution time and improving test efficiency.
You can also use Scenario Tables to organize and select login tests directly, streamlining authentication management across multiple test configurations.
**How it works:**
Select the appropriate login state option based on your testing needs.
Begin this test using the login state from another test. This allows tests to skip login steps and start directly from an authenticated state, reducing execution time and improving test efficiency.
You can also use Scenario Tables to organize and select login tests directly, streamlining authentication management across multiple test configurations.
**How it works:**
 1. Check "Start from logged-in state"
2. Select a login test from the dropdown
3. Your test will begin with the authentication state from the selected test
* Tests that require an authenticated user
* Avoiding redundant login steps
* Maintaining consistent test state
Make this test's login state available for other tests to use. Ideal for creating dedicated login tests that other tests can reference.
Login states are saved at the end of test execution and can be used by other tests that select this test as their login state source.
**How it works:**
1. Check "Start from logged-in state"
2. Select a login test from the dropdown
3. Your test will begin with the authentication state from the selected test
* Tests that require an authenticated user
* Avoiding redundant login steps
* Maintaining consistent test state
Make this test's login state available for other tests to use. Ideal for creating dedicated login tests that other tests can reference.
Login states are saved at the end of test execution and can be used by other tests that select this test as their login state source.
**How it works:**
 1. Check "Save login state for other tests"
2. Complete your login test
3. Other tests can now select this test as their login state source
* Creating reusable login tests
* Making authentication states available across test suites
* Reducing test execution time
## Parallel Test Execution with Multiple Accounts
When running tests in parallel, it's recommended to use different accounts for different test suites to prevent state interference.
**This ensures:**
* Tests can run simultaneously without affecting each other's states
* Each test suite has its own isolated authentication context
* Changes made in one test suite won't impact the others
* You can maintain predictable test behavior in parallel execution
## Best Practices
**Create Dedicated Login Tests**
* Make separate tests for different user roles
* Keep login tests focused and minimal
* Use clear naming conventions (e.g., "Admin Login", "Customer Login")
**State Management**
* Save login states from tests that perform authentication
* Reuse login states to reduce test execution time
* Consider test dependencies when managing states
**Security Considerations**
* Use environment variables for credentials
* Regularly update saved login states
* Clear authentication data in teardown tests when needed
If you're experiencing issues with authentication in custom configurations, please reach out to the Spur team. We're here to help optimize authentication for your specific setup.
1. Check "Save login state for other tests"
2. Complete your login test
3. Other tests can now select this test as their login state source
* Creating reusable login tests
* Making authentication states available across test suites
* Reducing test execution time
## Parallel Test Execution with Multiple Accounts
When running tests in parallel, it's recommended to use different accounts for different test suites to prevent state interference.
**This ensures:**
* Tests can run simultaneously without affecting each other's states
* Each test suite has its own isolated authentication context
* Changes made in one test suite won't impact the others
* You can maintain predictable test behavior in parallel execution
## Best Practices
**Create Dedicated Login Tests**
* Make separate tests for different user roles
* Keep login tests focused and minimal
* Use clear naming conventions (e.g., "Admin Login", "Customer Login")
**State Management**
* Save login states from tests that perform authentication
* Reuse login states to reduce test execution time
* Consider test dependencies when managing states
**Security Considerations**
* Use environment variables for credentials
* Regularly update saved login states
* Clear authentication data in teardown tests when needed
If you're experiencing issues with authentication in custom configurations, please reach out to the Spur team. We're here to help optimize authentication for your specific setup.